This old tuba was obtained in a bad condition. Parts were missing and a partly violent repair had been done in several cases. Also quite some wear to the valves was observed. To that came som bad surprises that I was not aware of when the work began. Had I known, the tuba might have been scrapped. Another problem proved to be the materials that were of a brass alloy that tends to cracks (but gives a good sound!). Hard soldering at too high temperatures did not make that problem better. But repaired it was. Here are some pictures showing you just a little part of that work, which took more than 80 hours.
|
||
| A cracked tube being hard soldered | A stuck valve slide is loosended | Dents being reparired |

Many tubes had cracks and had to bee cleanded from over 100 years of dirt. Then the long side cracks were hard soldered. Tuning slides and valve slides were all stuck, one even tin soldered. To get them free, the loop was removed, a long term treatment with chemicals was needed, and then each slide was dragged out with a dragging hammer. Then a lot of dents and bends had to be corrected, which was a difficult work on that brass alloy. even if annealed several times.
| A bad surprise hidden under a shield | More bad surprises | Same loop atfer repair |
Much can hide under a shield. This tuba had a somewhat odd shield made of copper that was tin plated in order to look like nickel siver! Under the shiled large holes and dents were hidden. Exessive soldering flux caught under the shield had corroded its way trough the tube. This tube part took longer time to work up, than the valve engine. The tube was repaired, but some scars will always be visible.
|
||
| Valve bearing being reamed | New bearing being hard soldered into place | Turning the new bering into precise fit. |
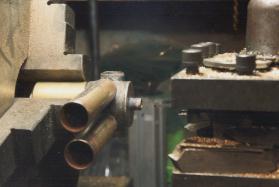
The valves vere extremely worn. It takes much to destroy rotary valves beyond repair, but this was close to. All valve bearings vere worn, causing the valve rotor to scrape against the valve body. Thus all walve bearings were replaced. The old bearing that has become oval, is reamed to recieve the new bearing, that is hard soldered to the inside of the old bearing. Then it is all turned into a precise fit on a lathe. It takes 3-5 hours per valve when it is as bad as here.
| Washing off the bell | Polishing a valve | Soft soldering the tube parts |
When brass gets black, and also very dirty, it takes strong things to get it clean again, a work that is best done outside. Later each part is polished on a machine, hand polishing is only neccesary in edges not accessible to the machine. Then the parts can be assembled again, using soft (tin) soldering.
| All parts at one view | Replacement for a missing ferrule being made. | Assembling the parts |
Also some missing parts have to be replaced. In this case it was some screws, a ferrule, and a tuning slide that had to be replaced. These parts are made to match the design of the tuba, and the trend of the late 1800's Egg trays are well suited for storing the smaller parts. Finally all parts could be assembled, and here it is.
|
|
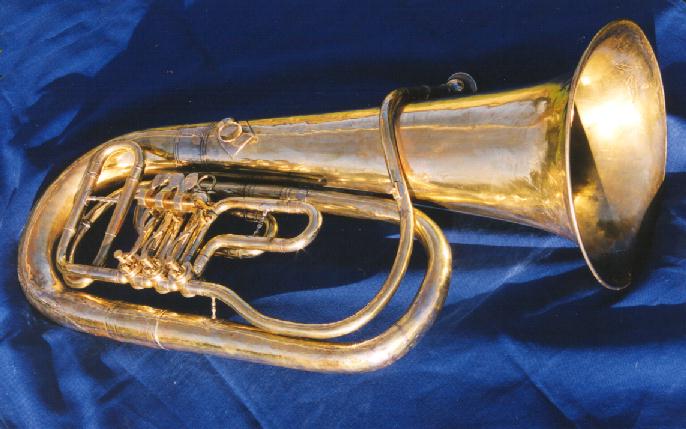
| Before | After |
Just ask what you want to know.... [email protected]
Back
